The Keys to Sharper Images
Derek Smith • 23 January 2021
Like every other photographer in this lockdown pandemic world that we currently inhabit, we long to be travelling, and taking photographs. Deeply saddened by the high Coronavirus mortality rate, and infections, it’s sometimes hard to be motivated to take photos, especially in this lockdown situation, where photo opportunities are limited.
Nonetheless, I believe that it’s important to be out as much as possible, with our cameras, making the most of whatever opportunities arise. The snowdrops are out now, and sunrise, sunset photos make great subjects, you only have to see the weather watchers photos on the television weather forecasts.
So, how do we improve the photos that we do take? Composition skills are certainly one avenue to explore, but today I want to discuss the topic of sharpness in our images. The key elements to sharp images are focus, depth of field, and shutter speed.
Focus
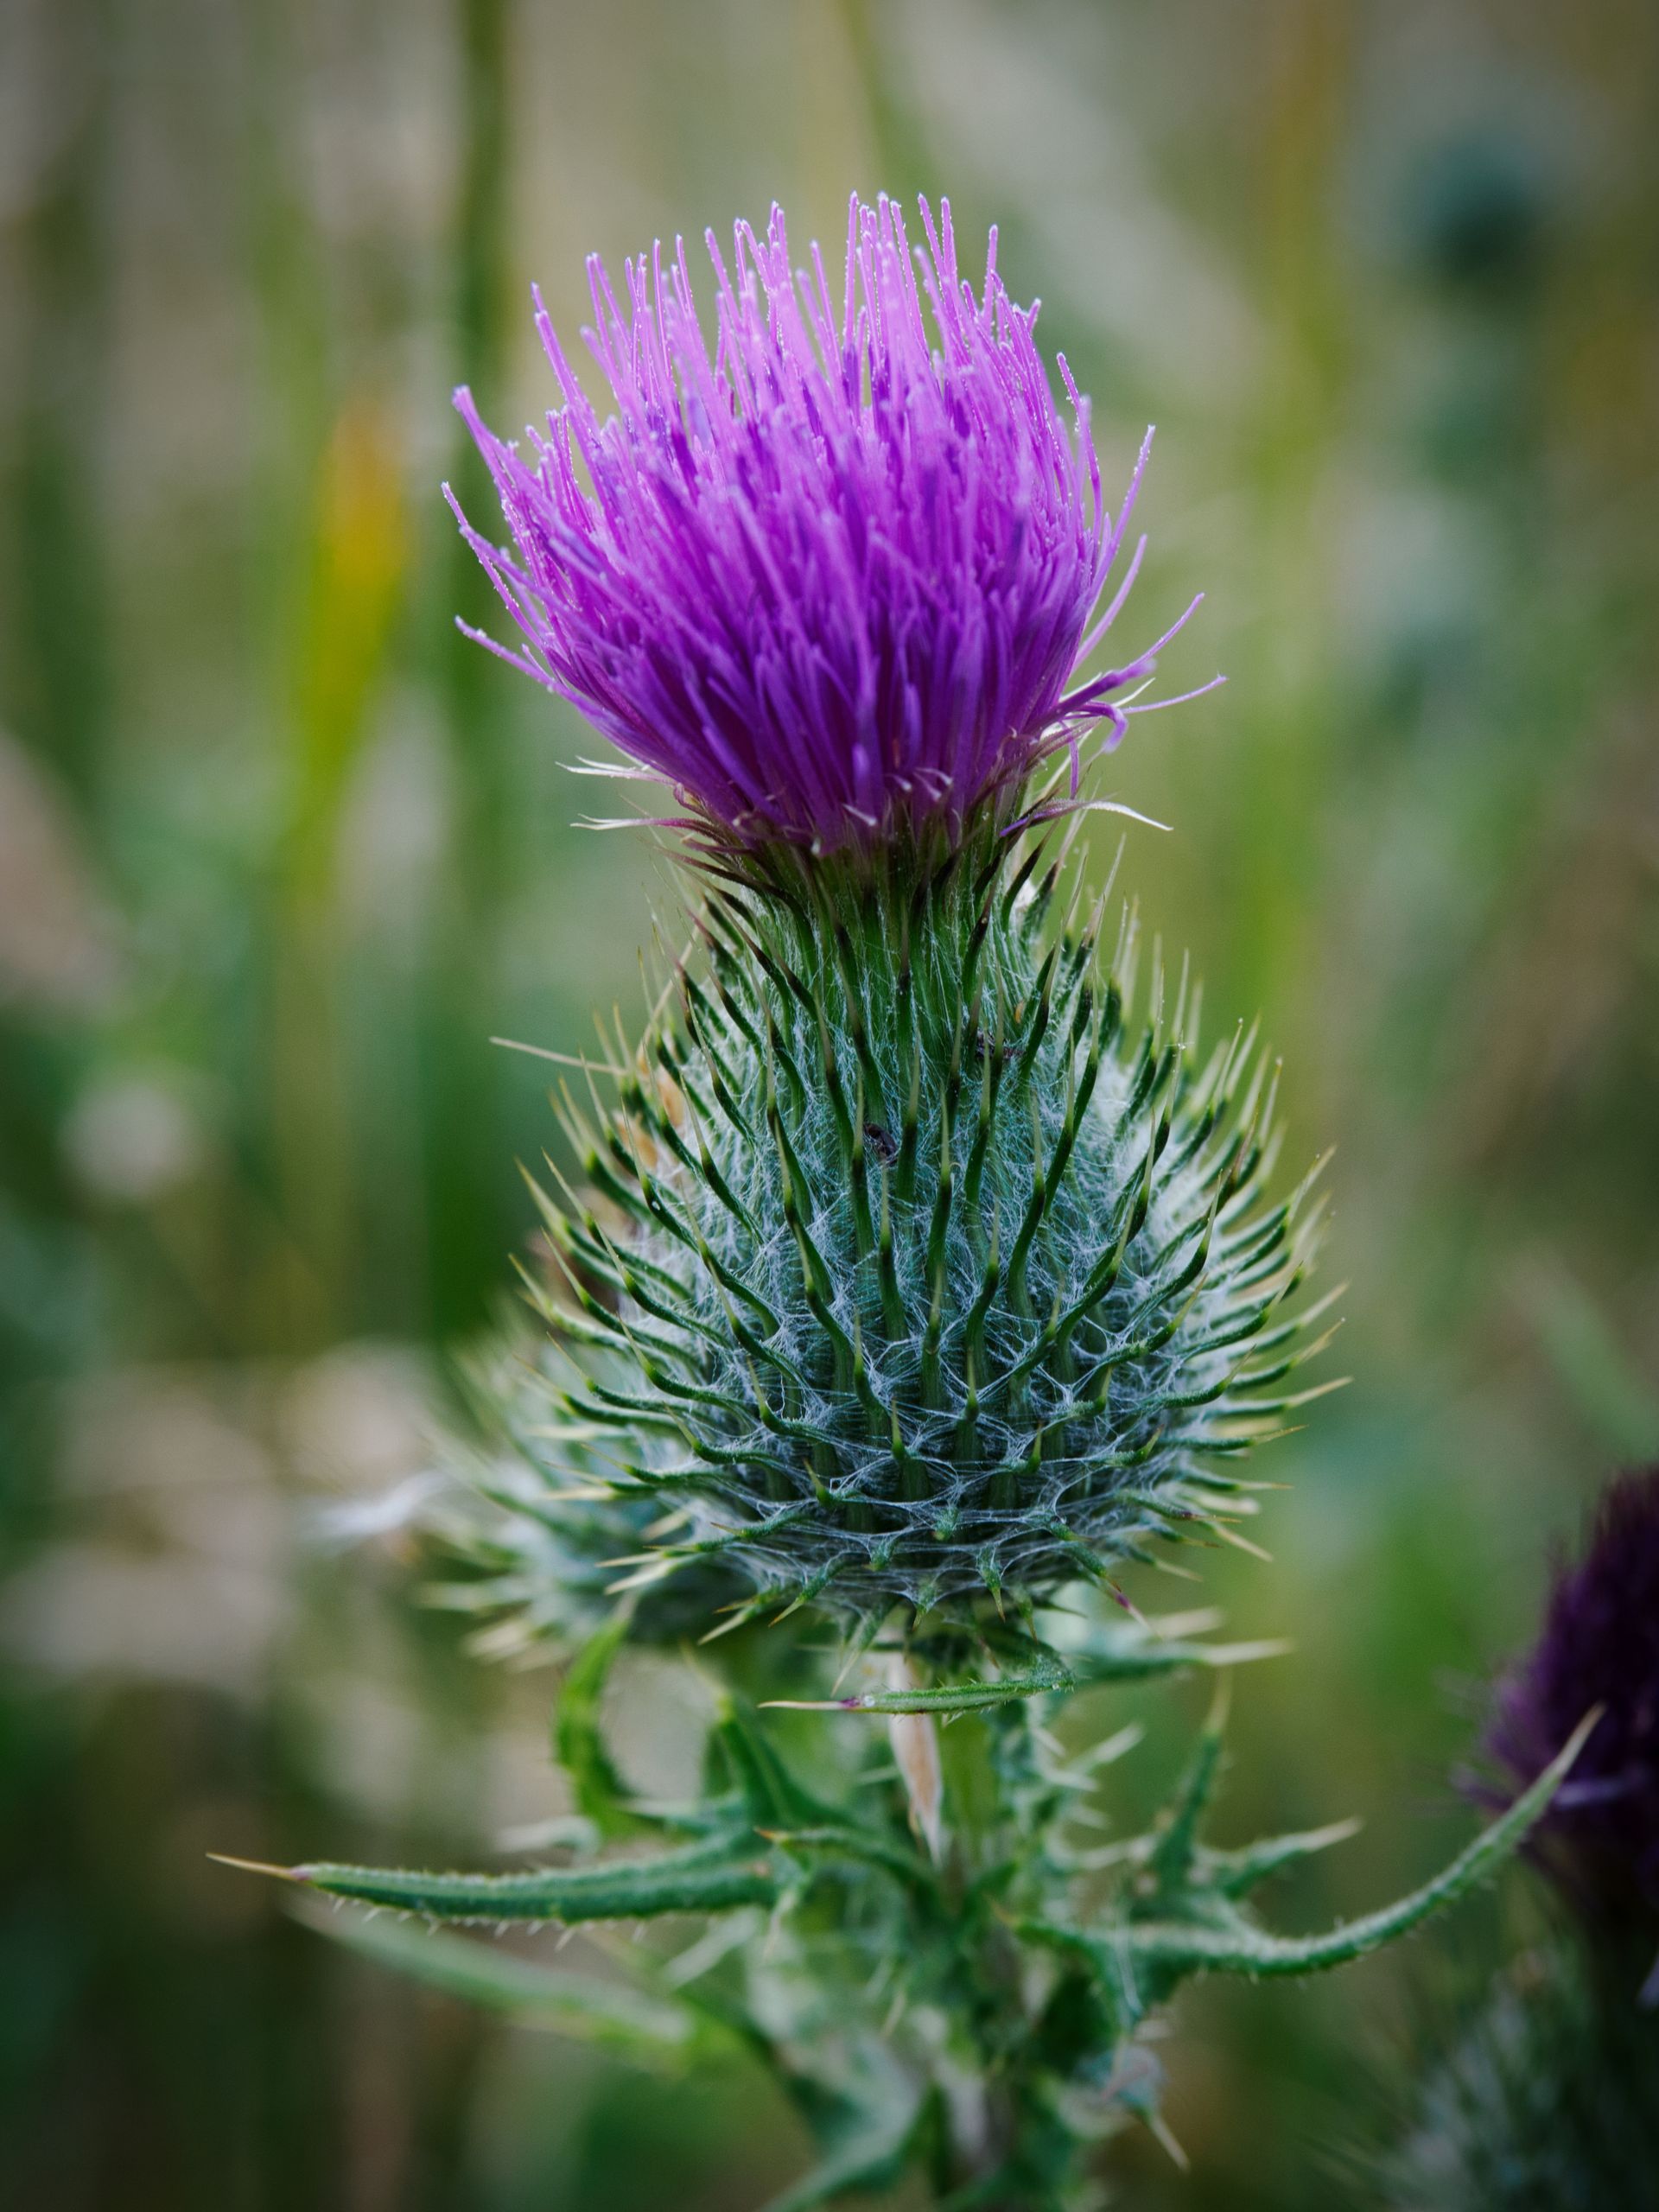
The first point to remember is that cameras are very clever, but not mind readers, the auto focus on the camera needs to be guided to the correct focus point. For portraits, and animal photography use the smallest focus point and focus on the eyes, S-AF will be the best camera setting for posed photos, you may need to switch the focus mode to C-AF, or AI Servo for moving subjects, and possibly with a slightly larger focus point, or even a small group of focus points. For landscape photography the focus point is determined by the hyper focal point. However, the easier method is to focus a third of the way into the scene, because camera focus is sharp at the focus point, a third of the way in front, and two thirds of the way behind the focus thus ensuring a sharp foreground, and background. For macro photography the rule here is not to get too close to the subject, as the depth of field reduces as you get closer to a subject, so stay back, and crop into the image during post processing. When using manual focus, use whatever aids your camera has; focus peaking, or magnification to ensure the subject is in focus.
Depth of Field
Controlling the depth of field in an image is relatively easy if using the aperture priority mode on the camera. Portraits with a shallow depth of field and blurred background can be obtained by opening the aperture to f/2 to f/4 in natural light. For wildlife f/5.6 to f/6.3, landscape photography will require stopping the aperture down to f/7.1 to f/14. These aperture settings are dependent upon the available light, the lens, and camera used. Be aware that a lens opened wide open may not be sharp in the corners of the frame, and exhibit darker corners, called vignetting. Conversely, a lens stopped down f/16 to f/22 might give softer images owing to an effect known as diffraction, where not all the light rays are directed onto the sensor. Lenses will often be sharpest at a particular aperture setting usually around the range f/4 to f/8 this is known as the “sweet” spot of the lens.
Shutter Speed
A rough guide to the best shutter speed for handheld photography is to match the shutter speed to the focal length of the lens, with a 50mm lens 1/50, 300mm lens a faster speed of 1/300. Now, starting off the camera settings in Aperture Priority mode and fixing one of the exposure triangle parameters leaves the photographer with only the ISO adjustment to obtain the correct shutter speed, and exposure. Most modern cameras will happily shoot up to ISO 1600 without any noise issues. The type of scene that will need care with shutter speed will be: wildlife, sports, and children, moving water, and windy conditions causing moving flowers, grasses, and leaves.
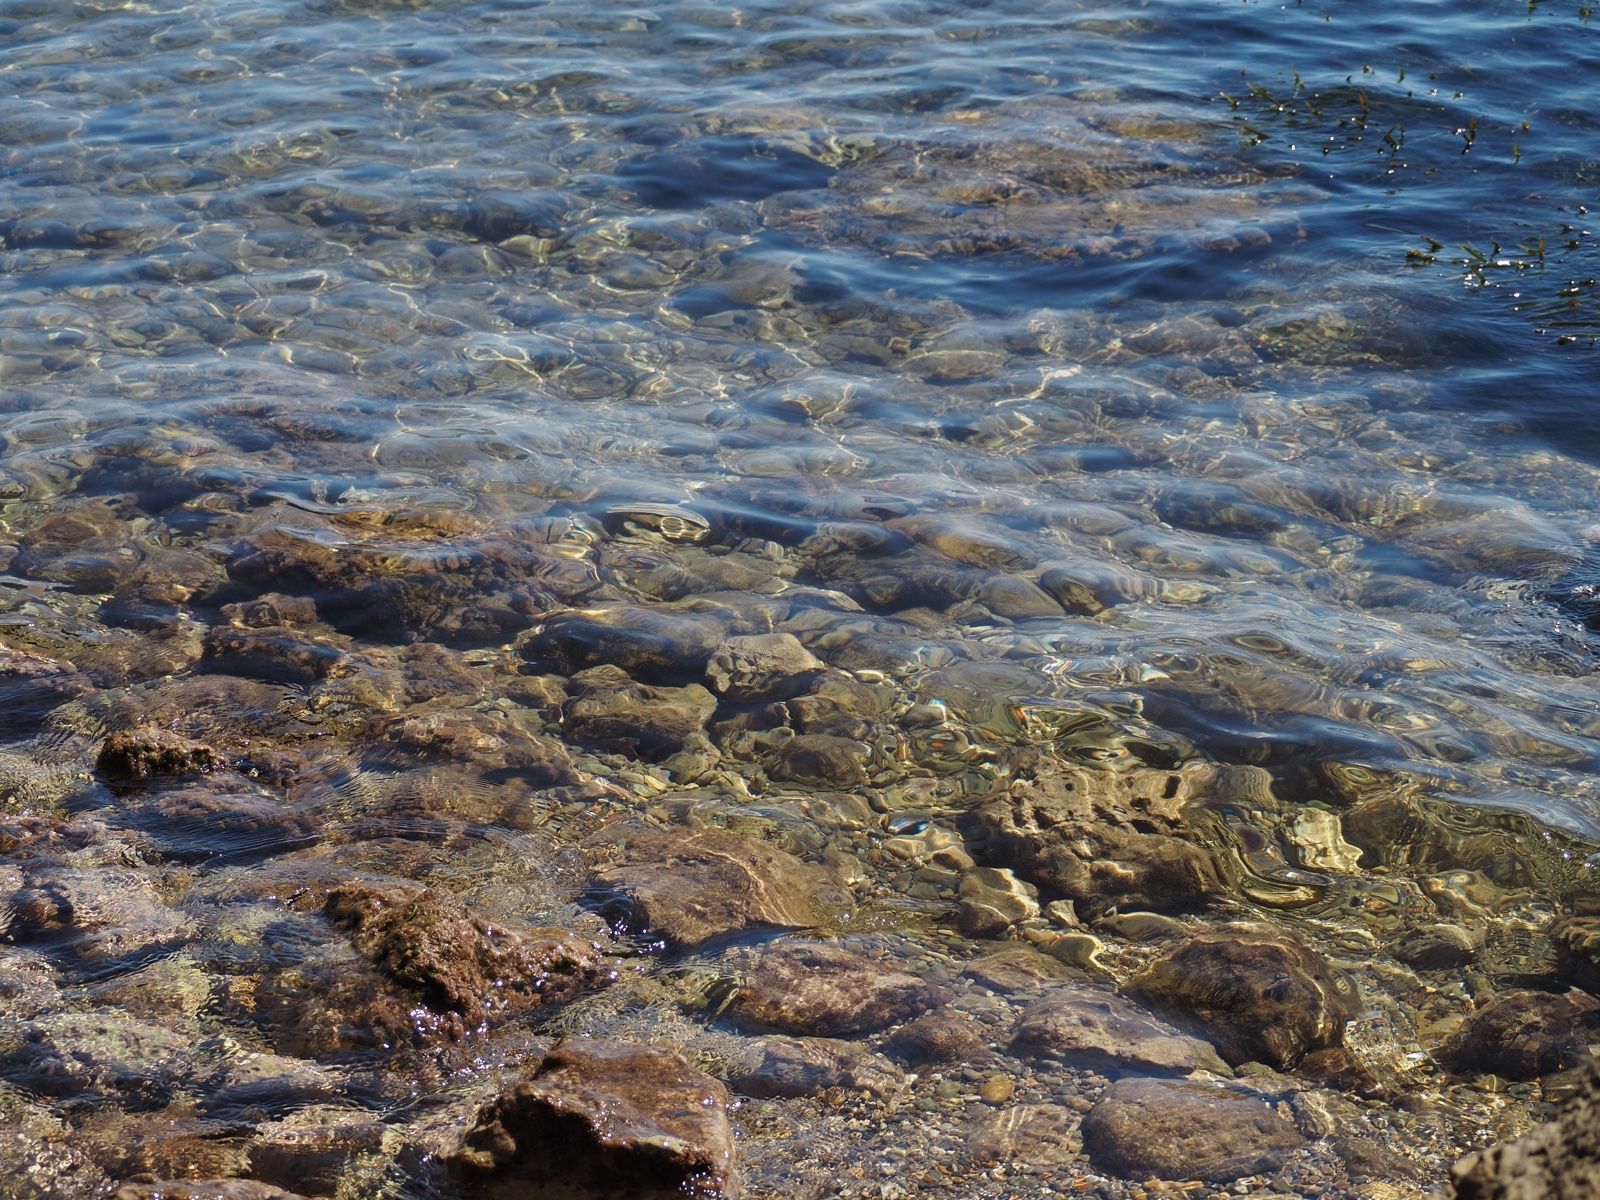
Looking at this tree reflection image, taken a few days ago, I have set the aperture to f/7.1 (ideal for micro four thirds camera landscape photography) ISO200, shutter speed 1/100, with these settings the hyper focal length is 2.71m ensuring sharpness from front to back. The lens used was my walk around favourite the Olympus M.Zuiko 17mm f/1.8 (35mm full frame equivalent), on the Olympus PEN E-PL7.
For the nuthatch image it was a very different scenario, using the Olympus OM-D E-M5 lll, and the M.Zuiko 40-150mm f/2.8, with the x2 convertor. Setting the aperture to f/6.3, and ISO1000, the resultant shutter speed of 1/250 was sufficient to capture the bird at a full frame equivalent focal length of 600mm. The 5 axis image stabilisation of the Olympus camera really does pay dividends for handheld wildlife photography.
Stay safe, and enjoy your hobby.
Nonetheless, I believe that it’s important to be out as much as possible, with our cameras, making the most of whatever opportunities arise. The snowdrops are out now, and sunrise, sunset photos make great subjects, you only have to see the weather watchers photos on the television weather forecasts.
So, how do we improve the photos that we do take? Composition skills are certainly one avenue to explore, but today I want to discuss the topic of sharpness in our images. The key elements to sharp images are focus, depth of field, and shutter speed.
Focus
The first point to remember is that cameras are very clever, but not mind readers, the auto focus on the camera needs to be guided to the correct focus point. For portraits, and animal photography use the smallest focus point and focus on the eyes, S-AF will be the best camera setting for posed photos, you may need to switch the focus mode to C-AF, or AI Servo for moving subjects, and possibly with a slightly larger focus point, or even a small group of focus points. For landscape photography the focus point is determined by the hyper focal point. However, the easier method is to focus a third of the way into the scene, because camera focus is sharp at the focus point, a third of the way in front, and two thirds of the way behind the focus thus ensuring a sharp foreground, and background. For macro photography the rule here is not to get too close to the subject, as the depth of field reduces as you get closer to a subject, so stay back, and crop into the image during post processing. When using manual focus, use whatever aids your camera has; focus peaking, or magnification to ensure the subject is in focus.
Depth of Field
Controlling the depth of field in an image is relatively easy if using the aperture priority mode on the camera. Portraits with a shallow depth of field and blurred background can be obtained by opening the aperture to f/2 to f/4 in natural light. For wildlife f/5.6 to f/6.3, landscape photography will require stopping the aperture down to f/7.1 to f/14. These aperture settings are dependent upon the available light, the lens, and camera used. Be aware that a lens opened wide open may not be sharp in the corners of the frame, and exhibit darker corners, called vignetting. Conversely, a lens stopped down f/16 to f/22 might give softer images owing to an effect known as diffraction, where not all the light rays are directed onto the sensor. Lenses will often be sharpest at a particular aperture setting usually around the range f/4 to f/8 this is known as the “sweet” spot of the lens.
Shutter Speed
A rough guide to the best shutter speed for handheld photography is to match the shutter speed to the focal length of the lens, with a 50mm lens 1/50, 300mm lens a faster speed of 1/300. Now, starting off the camera settings in Aperture Priority mode and fixing one of the exposure triangle parameters leaves the photographer with only the ISO adjustment to obtain the correct shutter speed, and exposure. Most modern cameras will happily shoot up to ISO 1600 without any noise issues. The type of scene that will need care with shutter speed will be: wildlife, sports, and children, moving water, and windy conditions causing moving flowers, grasses, and leaves.
Many dedicated sports photographers will choose to shoot in Shutter Priority mode, or even Manual exposure mode, but for the vast majority of photographers Aperture Priority mode makes camera settings easier to understand.
Looking at this tree reflection image, taken a few days ago, I have set the aperture to f/7.1 (ideal for micro four thirds camera landscape photography) ISO200, shutter speed 1/100, with these settings the hyper focal length is 2.71m ensuring sharpness from front to back. The lens used was my walk around favourite the Olympus M.Zuiko 17mm f/1.8 (35mm full frame equivalent), on the Olympus PEN E-PL7.
For the nuthatch image it was a very different scenario, using the Olympus OM-D E-M5 lll, and the M.Zuiko 40-150mm f/2.8, with the x2 convertor. Setting the aperture to f/6.3, and ISO1000, the resultant shutter speed of 1/250 was sufficient to capture the bird at a full frame equivalent focal length of 600mm. The 5 axis image stabilisation of the Olympus camera really does pay dividends for handheld wildlife photography.
Stay safe, and enjoy your hobby.

Reflections
Photo By: Derek Smith

Nuthatch
Photo By: Derek Smith
Louth Photographic Society
Last night our members enjoyed a visit to the Swaby valley nature reserve. We crossed over two fields from South Thoresby, then followed the course of the Swaby Beck chalk stream through the valley, the public footpath was bounded by dense vegetation that hindered our progress at times. There was plenty to see around the reserve, myriad butterflies flitted around in a very lively manner, making for difficult photography, I spotted several small grasshoppers, and soldier beetles in the long grass, I tried to photograph a ladybird, but it was gone by the time I focussed on the creature. It was a very enjoyable evening, with good friendly company, and our camera skills were needed for the macro photography, these are a few of my photos from the evening.

Good Morning All Last week's outing was re-scheduled due to a clash with a certain world cup match, the good news was a victory for England, however we intend to still hold the outing on Wednesday 22 nd July. I did go to the Festival of Flight at the Shuttleworth collection, Old Warden last weekend. It was too windy for some of the old Biplanes, but we were treated to a four-and-a-half-hour display featuring many planes that I had never seen fly before. The De Havilland Comet was built to compete in the 1934 race from Britain to Australia, only three were built and it's good to see it flying, the aircraft design was quite advanced for 1934. This week, Wednesday 8th July, we have another camera club outing to the Swaby Valley, meeting at 6pm. Swaby is just off the A16 heading from Louth to Skegness. Regards Graham

Last night’s Louth Photographic Societies outing to Kirkby gravel pits nature reserve was cancelled as some members preferred to watch some sporting gentleman by the name of Harry Kane. (Congratulations to the England team) The reserve is small, and simply laid out, a public footpath leads along a tree lined avenue to the river Bain at the back of the reserve. Historic sand and gravel extraction has left a large lake in the centre of the reserve, several ducks and waterfowl inhabit the lake and there is a bird hide on the shoreline. Returning to the road, there is a path running parallel to the road bounded by a hedge, insects of various types can be found in this area, damselflies, butterflies, and hover-flies are often prolific. Our outing to Kirkby Gravel pits is now scheduled for Wednesday 22nd July. Parking is on the verge by the roadside. Kirkby Gravel pits are fairly close to where I live, and it’s reserve that I often visit, these are some photos from a visit in July last year.

Good morning, All, Last week at the club we had our monthly print competition, Trees and Open. There was a very good entry with a high standard of photography on show. Tony Gaskins was first in the Open and I managed a first in the trees, all the results are on our website and there is also a blog on the evening. This week, Wednesday 1st July, we are having an outing to Kirkby Gravel Pits, if we meet at 6.30 at the reserve, though you can arrive earlier as there are usually dragonflies etc around the entrance. If we walk straight ahead first, then anyone who arrives late can find us. I have struggled to find a map, but you can see the location on the Lincolnshire wildlife Trust website. Kirkby Grave Pits is also a good reserve for birds. Tattershall Road 1 mile south of Kirkby-on-Bain Woodhall Spa Nearest postcode LN10 6YN. Please note - postcodes are for the nearest registered address as we are unable to get postcodes for nature reserves.

A print competition was held last night with the categories of "Trees" as the subject, and "Open". Our judge for the evening was Gail Wrigg from Barton who did an expert job. The first category to be judged was the "Open" with the high standard of prints making the choice of top placement difficult, and Gail held back 9 prints for further evaluation. There were some chuckles from members around one of Richard Hildred's prints of wooden electricity poles titled "In my previous life I used to be one of them" an "in" joke from Richard, which totally baffled Gail. After the break Gail judged the "Trees" category, with 7 prints held back this time for awarding of higher marks, the beautiful colours of some trees, especially the autumnal images contrasting with the stunning monochrome infrared prints from Richard Hildred. It was a great evening, with excellent prints on display, and the website Competition page has been updated with the full results.

Good Morning All Last week we visited the nature reserves at Fir Hill quarry and Muckton wood. I have written a blog report on the evening which is on our website. You can always try something a little different like I did using camera movement. This week, Wednesday 24th June, a print competition will be held, with the categories of "Trees" and "Open" and is to be judged by Gail Wrigg. The following week we have an outing to Kirkby Gravel pits. If you want advice on camera settings etc the outings are the perfect opportunity to ask other members while we all have our cameras. Regards Graham
Each year Louth Photographic Society begins a new project, one photo taken each month on a specific subject, that's 12 photos presented on "Project Night" in January. Last year the subject was "Prime Time" one photo each month taken with the same fixed focal length lens. This year the subject is water, the subject sounds easy enough, and I've completed 5 photos already, but I'm struggling a little with a photo for June. I'm currently on holiday in Corfu, an island surrounded by water which should be easy, but I'm yet to find the "definitive" photo for the project. These are my photos so far this month: Best regards Derek

Good Evening All

Summer is here at last, maybe?

Last night a few of our members had an outing to Old Bolingbroke village. Initially visiting the Lincolnshire Wildlife Reserve of Sow Dale, off Spilsby Hill at the village entrance, I was a little hesitant at first at entering the reserve because of the grazing cattle. When the cattle herd moved up the hill we climbed over the stile and entered the reserve, as we began to take some photos around the reserve though, the herd returned, but seemed quite docile. Later in the evening we moved on to Bolingbroke castle, and took several photos of the castle, fauna, and flora. It was a lovely evening, good to get out with cameras, and socialise with others.